

A New Online Banking Experience
Need-to-know information for DNCU members.
A New Mobile App Experience is Coming
December 2022 will bring an update to our mobile app navigation, take a look at the video below to see how things will change.
Introducing The New Online Banking Experience At DNCU
With a variety of exciting features such as seamless functionality, innovative banking tools, and account aggregation, our new digital banking platform is another way that we’re adding value to your DNCU membership in 2022.
New Features
A quick look at just a few of the benefits for our online banking members.
-
Aggregate Accounts
View all your accounts, internal AND external, in one place.
-
Credit Card Management
Easily view your credit card information, manage travel notifications, alerts, etc.
-
More than A Score
View your credit score right from your online banking dashboard and test how adding a credit card or paying down debt affects your score in a credit simulation.
How To Prepare
Steps you can take now to get ready for the new online banking experience.
Please note that registration for the new service will be necessary for all DNCU online banking users. In order to determine your appropriate method of registration, it is important that online banking users identify and prepare the following information:
- The primary account owner
- Any joint account owner(s)
- Your oldest existing account with DNCU
- The accuracy of your contact information
The primary account owner name appears in the main address window of your monthly account statement. Joint account owner(s) names appear in the Account Summary section:

Online banking users are also advised to identify their oldest existing account with Del Norte Credit Union. If you need help in doing so, please reach out to us at 1-877-818-DNCU (3628) or visit a DNCU branch in-person and a DNCU representative will be glad to help.
More Tips On Preparing For The New Online Banking Experience
Transition Resources
Additional guidance and instructions for DNCU members including Bill Pay, External Transfers, Money Management, and more.
If you have an existing username for online banking and you are the primary owner of your account at Del Norte Credit Union please follow the steps in the orange text.
If you are a joint owner on this account, but you also have your own primary account, please also follow the steps in the orange text.
If you are a joint owner, and you DO NOT have your own account, please follow the instructions in the purple text.
During the new mandatory registration process, please download the new Del Norte Credit Union app or navigate to dncu.com. You may simply enter your existing username (tied to your oldest online DNCU account if you have multiple accounts) and password and click login to begin the process.
This will generate a one-time temporary password that you will receive via SMS, Voice, or email. After you enter the one-time temporary password, you will receive a prompt to reset your password.
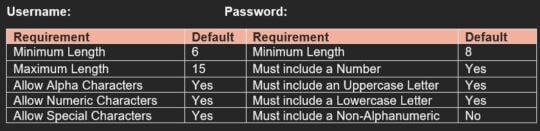
Your new password must meet the minimum requirement listed below:
As part of this upgrade, all account users will have their own online banking login privileges.
Joint account owners are required to register for the new online banking service. The following information is necessary for joint account owners to successfully complete this process:
- Zip Code
- Social Security Number
- Date Of Birth
- Last name
To register, please use our app or navigate to our website at dncu.com and follow the instructions below:
- Select LOGIN (located near the top right hand corner of your screen on desktop versions)
- Select ONLINE BANKING
- Select Register
You will then be prompted to verify protected information that matches the information on your account and accept the disclosure for Online Banking Access.
To keep your account secure, we have specific username and password requirements. Please reference the chart listed above.
Browser and Device Support
Access your accounts via desktop, tablet, or mobile devices anytime, anywhere. For an optimal experience, make sure your devices are using the most updated versions of software available.
● Browser Support – Make sure your browser is within the latest 2 versions (Chrome, Edge, Firefox) or the latest 2 major releases (Safari). Please note, Internet Explorer 11 does not support online banking and standards that are implemented in newer browsers.
● Device Support
- Windows: Versions still supported by Microsoft & support a browser listed above
- OS X: Versions still supported by Apple & support a browser listed above
- Android: Version 7.0+
- iOS & Safari: Last 2 major releases
|
|---|
In order to verify account access credentials, DNCU members are asked to input their external transfers information in the upgraded online banking system. Details of current external transfers will not automatically transfer to the new system.
NOTE: Members should also remain aware of due dates for any loan payments that are processed as external transfers.
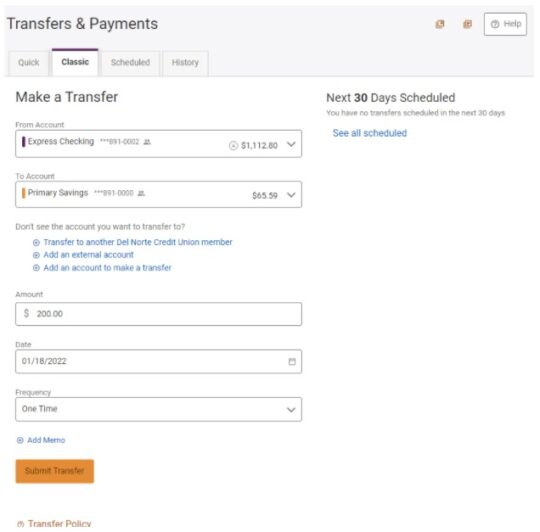
External transfers will continue to be processed until February 23, 2022. Please use the new online banking system to arrange for all external transfers after this date by using the Quick Guide below:
To add an external transfer account that is outside of Del Norte Credit Union:
- Select Transfers and click on the Classic tab.
- Click “Add an external account” located below the To Account field.
- Select “At another bank” from the dropdown menu. The “Add Account at Another Bank“ window is displayed.
- Enter an Account Type, Routing Number, Account Number, and Nickname.
- Review the ACH Transfer Policy information and check Agree to continue.
- Click the Save button to add the account or click the Cancel button to close the window.
The system will send two trial deposits to the account. This process may take up to three business days to complete. Before the account can be added to your profile, you must confirm the value of the first and second trial deposit.
The Financial Wellness page provides end-users with a singular, trusted landing spot to review and manage their savings goals within online banking.
Savings Goals
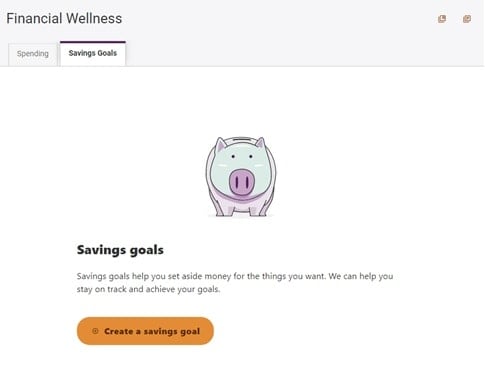
If no savings goals exist, the initial landing page will display an animated visualization inviting the end user to Create a Savings Goals. By selecting the Create a Savings Goal button the end user will begin the Add Goal flow.
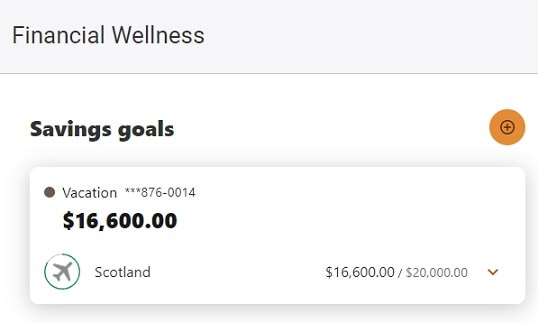
If there are existing Savings Goals, the landing page will open with a list of goals, grouped by account, and shown in cards.
Adding a Savings Goal
To add a new savings goal on Desktop, the end user clicks the Create a Savings Goal button if no goals currently exist. If goals already exist, the end user clicks the Add a Goal button.
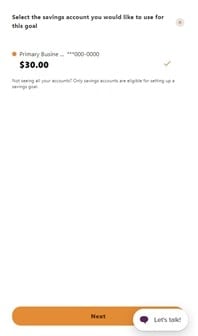
The Add Goal window will display and you must select a Savings account for the goal. Once the account is selected, click Next.
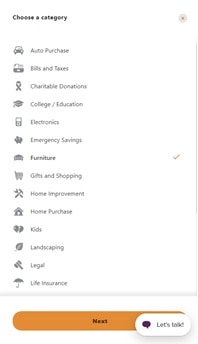
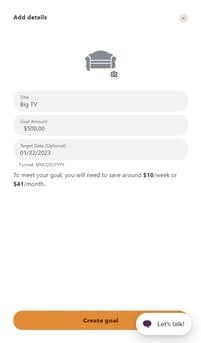
Select a category to set for the goal and click the Next button. Click the Goal Icon to add an image (this step is optional).
Then, enter the Goal Name, the Goal Amount, and an optional Target Date. When all of the goal details are filled in, click the Create Goal button. A success message will display, indicating the goal was successfully created.
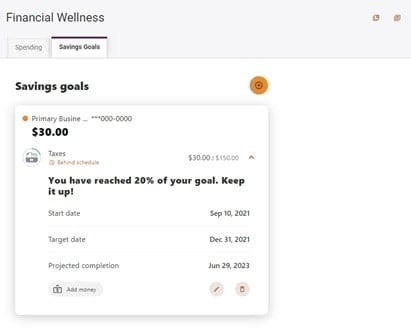
Savings Goals Cards
If you have an existing Savings Goal, the landing page will display a Savings Goal Card that can be expanded to show additional details about that goal. Each card will contain details on the account, the object of the goal, and the progress made towards the goal.
The account details show the associated savings account name, a masked account number, and the total balance of that account.
To the right of the goal name is a display showing the completed amount of your savings goal and just underneath the goal name shows the total progress of the goal as a percent. Based on your saving habits, the projected completion date estimates when you will meet this goal if you keep with the same frequency of saving towards the goal.
In order to use your Quickbooks account with DNCU’s new online banking service, you may be required to first make your existing DNCU account inactive inside your QuickBooks account.
After your existing DNCU is inactive, you may proceed to re-establish your QuickBooks account’s connection to your DNCU account. Look for additional conversion tips inside the new online banking service at dncu.com.
When you’re ready to make an account inactive:
- Go to Settings ⚙ and select Chart of accounts.
- Find the account you want to delete.
- Select the Action ▼ dropdown and select Make inactive.
Learn how to connect your bank and set up online banking for QuickBooks Desktop
Online banking is a feature that lets you connect your bank to QuickBooks. Then, you can download transactions and use online banking services within QuickBooks. There are two ways you can connect to online banking: Web Connect and Direct Connect.
If your bank offers both services, you might be wondering which suits you best. Here’s a comparison:
|
Web Connect
|
Direct Connect
|
We’ll show you how to set up both Web Connect and Direct Connect.
Step 1: Prepare
Before you begin, make sure that:
- QuickBooks is connected to the Internet.
- Your bank provides online banking services to QuickBooks.
- You have an online banking account set up with your bank.
- (Direct Connect) You have your customer ID and password/PIN ready. You can get your credentials from your bank.
Step 2: Set up Web Connect or Direct Connect
Note:
- QuickBooks doesn’t support multiple customer IDs with the same bank.
- You can only set up one customer ID per bank, and per company file.
You can download transactions from these account types:
| Bank account type | Account type in QuickBooks |
| Checking | Bank |
| Savings | Bank |
| Money market | Bank |
| Line of Credit | Bank, Other current liability |
| Credit card | Credit card |
Get started with online banking
Check out these articles to get you started with QuickBooks online banking.
YouTube Tutorials:
How to connect your bank & credit card accounts to QuickBooks Online
It is imperative to ensure that your contact details, including telephone number(s) and email address(es), are accurate and up-to-date.
You can update your contact information using any of the following methods:
- Log into your current online banking account at dncu.com using your web browser. Look for the “My Settings” link in the top right hand corner.
- Open the DNCU mobile app, select the “More” option, the gear icon and then choose “My Settings”.
- Visit any DNCU branch in New Mexico and speak with a DNCU representative.
- Call DNCU Member Support at 1-877-818-DNCU (3628)
Do you have questions regarding the above information or other issues related to the upgraded online banking system? Call us at 877-818-DNCU (3628) or visit the Contact Us page for additional ways in which you may communicate with DNCU Member Support.
Thank you for your attention to the above and for your ongoing membership with Del Norte Credit Union. We’re looking forward to continuing our relationship as your ideal partner for a better future this year and beyond.
Frequently Asked Questions (FAQ)
All of your current account information will transfer over securely to the new system. Once you log in, you’ll immediately notice a change to a dashboard layout which gives you a convenient, snapshot view of your accounts.
The biggest and best difference is that most everything you can do on the online platform can now be done on mobile, providing a seamless banking experience so you can easily manage your money from a single device. Even better, our new service offers a suite of user-friendly tools for doing everything from everyday banking to achieving long-term financial goals.
We are working to resolve this issue with Android. The app is updated and correct, only the name is wrong. Thank you for your patience.
Yes. If there is a shared account that you do not see under your login, please contact us directly.
Yes, you are able to change your username and password by navigating to Settings.
Yes, you will.
- Android mobile device – Delete the old application from your phone and download the new version from the Google Play Store.
- iOS mobile devices – Delete the old application from your phone and download the new version from the App Store.
You may also be interested in:
Del Norte Credit Union on YouTube
Check out DNCU’s library of video content, including guides to the new online banking experience, on our YouTube account.
Retail Member Guide
Read or download information and tips on features and functions in Del Norte Credit Union’s new online banking experience.